




The Asphalt Driveway Installation Process
Key Takeaways
|
Palm Beach County Driveway Installation: What to Expect From Start to Finish
The asphalt driveway installation process starts with dirt, drainage, and a roller, long before your tires touch that fresh blacktop. We assess the property, prepare the ground, build a stable base, place hot-mix asphalt, and compact the surface. Each step supports a driveway built for the vehicles that use it.
 South Florida rain and heat make preparation a priority. Weak soil, trapped water, and poorly supported edges leave pavement vulnerable to sinking and cracking. A successful installation addresses those conditions before the paving equipment arrives.
At Trinity Asphalt Paving, we help homeowners and businesses understand the work their property needs. Based in West Palm Beach, we install driveways, sidewalks, and parking lots throughout South Florida.
Our services include new blacktop installations, resurfacing, repairs, maintenance, sealing, and patching, along with asphalt projects for condo associations and HOAs.
Before work begins, tell us about recurring puddles, sinking areas, and heavy vehicles that use your driveway. Those details help us identify drainage and support needs that a fresh layer of asphalt alone cannot resolve.
Start With a Property Assessment and a Clear Written Estimate
A smooth-looking driveway does not reveal everything underneath it. A West Palm Beach driveway with recurring depressions needs an assessment of the foundation and drainage before anyone recommends fresh asphalt.
We evaluate the existing surface, ground conditions, driveway layout, and connections to garages, sidewalks, and the street. Vehicle use matters, too. A driveway carrying passenger cars faces different demands from one receiving RVs, equipment, or loaded trailers.
Your written estimate will explain:
- The area included in the work.
- Removal, excavation, and base preparation.
- Proposed materials and finished pavement thickness.
- Drainage corrections and transitions.
- Scheduling, access restrictions, and cleanup.
Our new driveway installations begin with preparing the property for the pavement above it. Trinity Asphalt Paving explains the recommended work so you understand what your estimate covers and why it belongs in the project.
The Asphalt Driveway Installation Process, Step by Step
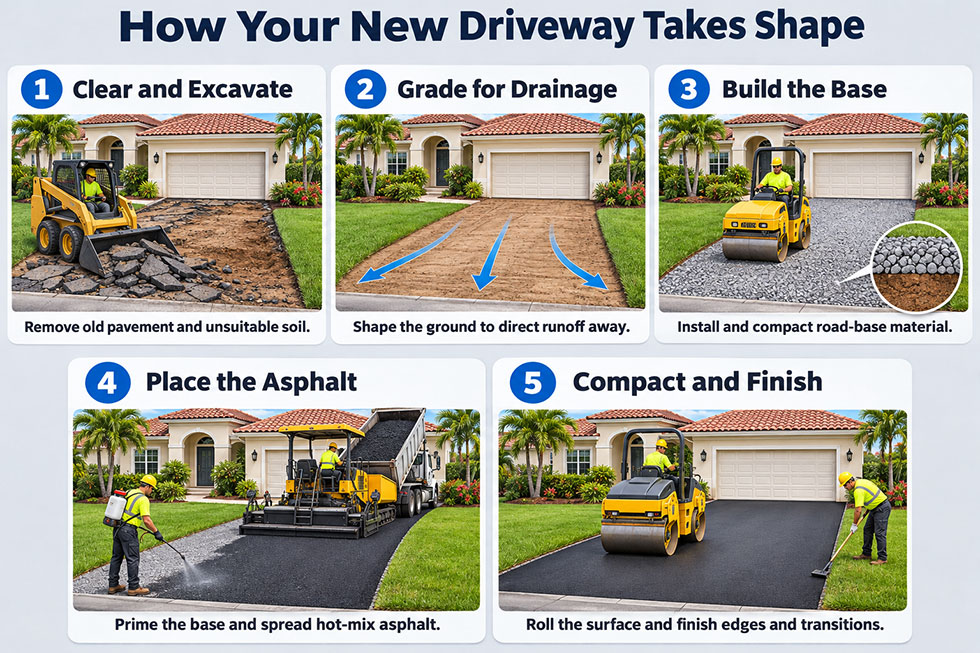
1. Remove Existing Materials and Prepare the Ground
We clear vegetation, debris, and unsuitable material from the driveway area. For replacement projects, removal also addresses failed pavement within the agreed scope.
Excavation creates space for the planned base and asphalt layers. The required depth follows the pavement design and existing conditions. Soft ground needs correction before construction continues.
This stage establishes the foundation for everything that follows. Adding asphalt over unstable material leaves the original weakness underneath the new surface.
2. Establish Grades and Drainage
Water needs a clear path away from buildings and off the pavement. We establish elevations that connect the driveway to garage entrances, walkways, and adjacent surfaces while directing runoff toward appropriate drainage areas.
At an established property in Lake Ida in Delray Beach, existing landscaping, driveway entrances, and garage elevations shape that plan. Raising the pavement without accounting for those features creates problems at the transitions.
Proper grading also addresses low spots. A dark, smooth finish loses its value quickly if water collects where you park or walk.
3. Install and Compact the Road Base
The road base supports the asphalt and distributes vehicle loads to the prepared ground. We install road-base material and compact it before paving.
Base preparation deserves close attention on Wellington equestrian properties. Horse trailers and service vehicles place substantial loads on entrances, turning areas, and parking locations. Those demands belong in the construction plan from the beginning.
Weak spots need correction before the surface goes down. Extra asphalt thickness does not substitute for a stable foundation.
4. Prepare the Base and Place the Hot-Mix Asphalt
Our installation process includes applying asphalt prime to the prepared road base before placing hot-mix asphalt. The crew then spreads the asphalt to the planned depth and profile.
Layer construction follows the project design. A separate binder course and surface course are not requirements for every residential driveway.
Ask for thickness measurements that describe the finished, compacted pavement. Loose asphalt behind the paving equipment has a greater depth than the completed surface after rolling. Your estimate should make that distinction clear.
5. Compact the Asphalt and Finish the Edges
Rolling compacts the asphalt while it remains workable. Proper compaction helps the pavement resist movement under traffic and limits spaces that allow air and water into the mix.
The crew also addresses edges, seams, and connections to surrounding surfaces. Garage aprons, sidewalks, and existing pavement need deliberate transitions.
Edge support matters because tires concentrate weight near the sides of a driveway. A finished edge needs support from the planned pavement structure and adjacent grading.
How South Florida Weather Affects Your Installation Schedule
A paving date depends on the readiness of the ground and the weather window. Standing water and saturated material require attention before asphalt placement.
The National Weather Service reports that South Florida receives 60–70% of its average annual rainfall during the wet season, which runs from May 15 through October 15. That concentration of rain makes drainage and scheduling part of the installation plan.
On larger properties in Loxahatchee and The Acreage, long access routes and low areas deserve inspection before heavy equipment enters. Ground that looks dry at the surface still needs evaluation for stability.
Separate the paving stage from the complete project schedule. Removal, ground corrections, base construction, weather delays, and access coordination all affect the work. The hot-mix placement is one stage within that larger sequence.

How to Prepare Your Property for Paving Day
A little preparation helps the crew work efficiently and keeps your household moving while driveway access closes.
Before work begins:
- Move vehicles outside the work area.
- Arrange alternate parking.
- Remove planters, portable basketball hoops, and other movable items.
- Reschedule deliveries that require driveway access.
- Discuss irrigation, gates, pets, and pedestrian access with the crew.
- Resolve applicable HOA requirements before the scheduled work.
For a home in Boca Raton, community access rules and delivery schedules belong in that conversation. At Royal Palm Beach properties with shared entrances or nearby common areas, coordinate access before equipment arrives.
Tell us about daily needs early. School pickups, home healthcare visits, and work vehicles affect how you prepare for the closure.
When Can You Use Your New Driveway?
Fresh hot-mix asphalt becomes ready for traffic as it cools and gains stability. The binder continues hardening after the surface opens.
Follow the crew’s instructions for your property. Heat, pavement construction, vehicle weight, and site conditions affect the opening time. Crossing the driveway in a passenger car and leaving a heavy vehicle parked on it place different demands on fresh asphalt.
Our guidance on when you can drive on new asphalt explains the waiting periods and precautions in more detail.
Once access opens, keep your vehicle moving while turning the steering wheel. Avoid sudden braking, protect unsupported edges, and keep concentrated loads from trailer jacks or kickstands off the fresh surface. Discuss moving trucks, RVs, and equipment deliveries before bringing them onto the driveway.
Immediate sealcoating is not a required finishing step. The Asphalt Institute advises that a well-designed and constructed low-traffic pavement should not require sealing for approximately two to five years, depending on climate and construction quality. Plan maintenance around the pavement’s condition and the selected product’s requirements.
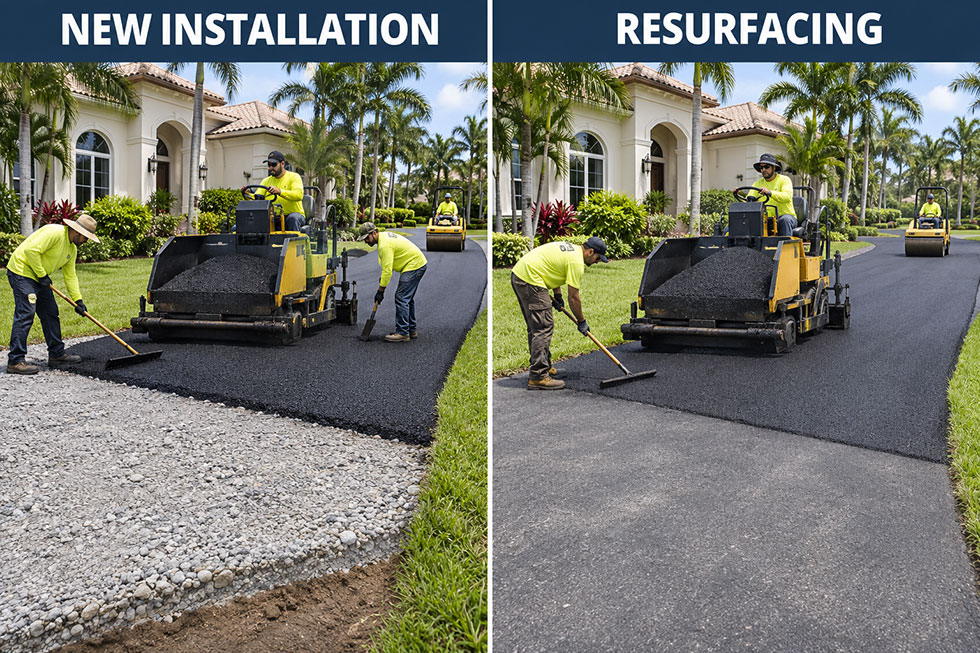
New Installation or Resurfacing: Which Work Does Your Driveway Need?
New construction builds the driveway structure on prepared ground. Replacement removes failed pavement and addresses underlying problems within the project scope. Resurfacing adds a new asphalt layer over an existing pavement that remains suitable for an overlay.
A West Palm Beach driveway with recurring potholes, sinking sections, or persistent standing water needs those causes evaluated before resurfacing. Covering the damage leaves the underlying problem in place.
For sound existing pavement, paving over old asphalt provides a way to renew the surface. Localized failed areas need correction first through work such as asphalt patching and pothole repair.
The right recommendation follows the condition of the driveway. Surface appearance alone does not decide the scope.
Work With a Local Team That Explains the Details
You deserve a clear explanation of the asphalt driveway installation process, from the first inspection through reopening your driveway. That includes the preparation, materials, access plan, and care instructions that apply to your property.
Trinity Asphalt Paving brings a family-owned team with three generations of experience to residential and commercial asphalt work. We evaluate the property and explain the recommended approach before construction begins.
From an established home in Boca Raton to a driveway replacement in Delray Beach, the work starts with understanding how you use the space and what the pavement needs.
Click here or give us a call at 561-889-2615 for a free, no-obligation quote.
Trinity Asphalt Paving, Inc.
📍 6643 Royal Palm Beach Blvd. West Palm Beach, FL 33412
📞 Call 561-889-2615
- Posted by Trinity Asphalt Paving
- On November 19, 2026
- 0 Comment
